Bank sample exercise
Creating View and ViewModel
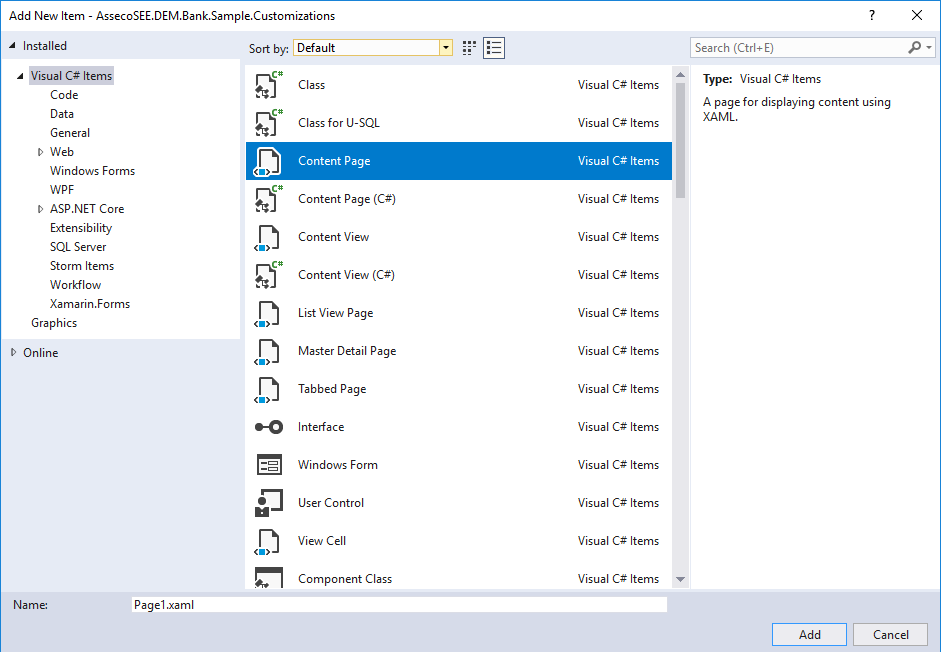
The first step is to add a folder named as Usecases to the root folder if it doesn't exist. Then, in created folder add a new folder named as your business case. In that folder add a new page, as in the picture below.

The name of content page should end with "Page". Two files will be created - .xaml and .xaml.cs. In .xaml you can define design of your page, while .xaml.cs is code-behind file where you can write your business logic.
Note
It is much better practice to write your business logic in ViewModel.
Created page should derive from UsecaseContentPage class, which provides support for navigation, and state management.
    [XamlCompilation(XamlCompilationOptions.Compile)]
    public partial class SamplePage : UsecaseContentPage
    {
Next, you have to add default namespaces in xaml, and change the page root element pages:UsecaseContentPage.
<pages:UsecaseContentPage x:Class="AssecoSEE.DEMO.Customized.SamplePage"
                              xmlns="http://xamarin.com/schemas/2014/forms"
                              xmlns:x="http://schemas.microsoft.com/winfx/2009/xaml"
                              xmlns:components="clr-namespace:AssecoSEE.DEM.Components.Components;assembly=AssecoSEE.DEM.Components"
                              xmlns:ctrl="clr-namespace:AssecoSEE.DEM.Components.Controls;assembly=AssecoSEE.DEM.Components"
                              xmlns:ext="clr-namespace:AssecoSEE.DEM.Components.XamlExtensions;assembly=AssecoSEE.DEM.Components"
                              xmlns:pages="clr-namespace:AssecoSEE.DEM.Core.Pages;assembly=AssecoSEE.DEM.Core">
    <ContentPage.Content>

    </ContentPage.Content>
</pages:UsecaseContentPage>
Now it's time to create a ViewModel. Add a new class in the same folder. Class name must be the same as the name of previously created view with "ViewModel" sufix at the end. Created view model should derive from the ViewModel base class so you can use its implemented interfaces and actions.
    public class SampleViewModel : PageViewModel
    {
Now you have to register view model in dependency injection container. In Application.cs, in RegisterTypes action add the following code:
            typeCatalog.AddOrUpdate(
                 new ViewModelInfo(typeof(YourViewModel))
                 {
                     PageTypes = new Type[] { typeof(YourPageRelatedToThisViewModel) }
                 }
             );
Your ViewModel is now registered and connected with its view.
After every change in Application.cs, you must change the value of a tick in BeforeRun action of the same class.
Implementing command objects
It's time to add some functionality to our mini application. Let's add a button in .xaml file. For more UI controls see https://docs.microsoft.com/en-us/xamarin/xamarin-forms/user-interface/.
        <StackLayout>
            <Button Text="Click me" />
        </StackLayout>
Let's say we want to print some text in a label on a button click. One way of doing this is a code-behind in .xaml.cs file but much better way is to create a command which we will bind to added control and work with it in a view model. This is much better approach because everything in view model can be used on another pages that are related to it.
        <StackLayout>
            <Button Text="Click me" Command="{Binding PrintTextCommand}" />
              <Label  Text="{Binding LabelText}"/>
        </StackLayout>
A command parameter can also be optionally defined using the CommandParameter property. The type
of the expected argument is specified in the CreateDelegateCommand<T> generic declaration.
After we bind command to control in .xaml, we have to create it in a view model. Also, we need a property by whom we will be able to print text in our label.
      public string LabelText { get => GetValue<string>(); set => SetValue(value); }

      public Command PrintTextCommand { get; protected set; }

      protected override void InitiateCommands()
      {
            base.InitiateCommands();

          PrintTextCommand = CreateDelegateCommand<object>(PrintText);
      }

      protected async Task PrintText(object arg)
      {
            LabelText = "OK";
      }
Navigation
Let's say we need to navigate from current page to another (for example a page with some details of data presented on current page), which is binded to the same view model. First thing that we have to do is to change the base class from which our view model derives. In order to be related with multiple pages view model must derive from MultiPageViewModel.
    public class SampleViewModel : MultiPageViewModel
    {

    }
Now, let's create a new page in a same way we did it before, but this time that page should derive from UsecaseSubPage.
Don't forget to register new page.
            typeCatalog.AddOrUpdate(
                 new ViewModelInfo(typeof(YourViewModel))
                 {
                     PageTypes = new Type[]
                        {
                           typeof(YourPageRelatedToThisViewModel),
                           typeof(DetailsPageRelatedToThisViewModel),
                        }
                 }
             );
Page navigation in DEM is accomplished by using the INavigationService. To obtain the INavigationService in your ViewModels simply ask for it as a property.
App.Navigation
Once you have the INavigationService in your ViewModel, you can navigate to your target views by calling the INavigationService.NavigateToAsync method.
Add a new button, bind it to a command and initiate command.
        <StackLayout>
            <Button Text="Go to details" Command="{Binding GoToDetailsCommand}" />
        </StackLayout>
public Command GoToDetailsCommand { get; protected set; }
GoToDetailsCommand = CreateDelegateCommand<object>(GoToDetails);
    protected virtual async Task GoToDetails(object arg)
    {
       await App.Navigation.NavigateToAsync(this, "YourDetailsPage");
    }
Passing parameters
Passing parameters to the next ViewModel can be done using an overload of the INavigationService.NavigateToAsync method. This overload accepts a NavigationParameters object that can be used to supply data to the next ViewModel. The NavigationParameters object is in fact just a dictionary. It can accept any arbitrary object as a value.
Add new View and ViewModel and register them. In xaml add an entry, bind it to Name property and change GoToDetails action so that now navigates to recently created ViewModel.
        <StackLayout>
            <Entry Placeholder="Enter your name" Text="{Binding Name}"/>
            <Button Text="Go to details" Command="{Binding GoToDetailsCommand}" />
        </StackLayout>
    public string Name { get => GetValue<string>(); set => SetValue(value); }

    protected virtual async Task GoToDetails(object arg)
        {
            if (String.IsNullOrEmpty(Name))
            {
                await Application.Current.MainPage.DisplayAlert("Alert", "Enter your name first", "OK");
            }
            else
            {
                var navigationParams = new NavigationParameters();
                navigationParams.Add("name", Name);
                await App.Navigation.NavigateToAsync("TransViewModel", navigationParams);
            }

        }
If user tries to redirect without entering his name, an alert will be displayed and action will be stopped. Otherwise, his name will be sent to next ViewModel. Then, in next ViewModel you can read read the parameters from the available NavigationParameters instance.
    <StackLayout>
            <Label Text="{Binding Name}" />
        </StackLayout>
public string Name { get => GetValue<string>(); set => SetValue(value); }
    if (navigationParameters != null && navigationParameters.ContainsKey("name"))
        {
            Name = navigationParameters.GetValue<string>("name", String.Empty);
        }
If parameter with key "name" exists, it becomes the value of Name property and it will be displayed.